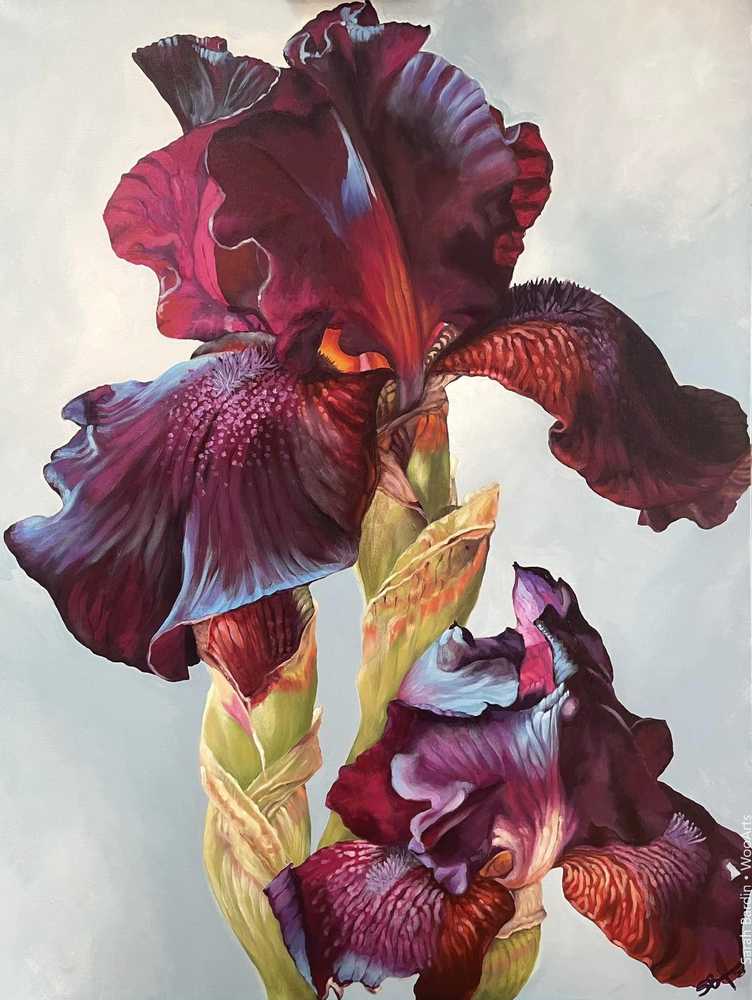
Ms. Bardin has a Bachelor of Arts in Interior Design from the University of Dayton and studied painting at The Compass Atelier. She has exhibited at the Maryland Federation of Art “Strokes of Genius” Juried Exhibition, Montgomery Arts Association Paint the Town Kensington Labor Day Show Juried Exhibition, Annual Labor Day Art Show at Glen Echo Park, Hill Center Galleries Juried Exhibition, and the Washington ArtWorks “A Burst of Color” Juried Exhibition.
Her family means the world to her. When she is not painting, she is spending time with her daughters. Whether it is attending their volleyballs games, or catching a movie, the time she spends with them is priceless. She also has them critique her work. She has been known to go back into a painting on the advice of one of her daughters after she believed it to be finished.
She currently resides in Washington, DC with her husband and two daughters.

Artist Painter Sara Bardin Website
Blooms on Canvas: Mastering Acrylic Floral Painting Techniques
Introduction
Acrylic floral painting is a breathtaking art form that allows artists to capture the delicate beauty and vibrant colors of flowers on canvas. This versatile medium offers a wide range of possibilities, from bold and expressive strokes to intricate details, making it a favorite among both beginners and seasoned painters. In this article, we will explore the techniques that go into creating stunning acrylic floral paintings, enabling you to bring nature’s splendor to life on your canvas.
Materials and Preparation
Before diving into the techniques, it’s essential to gather the right materials and prepare your workspace:
- Acrylic Paints: Acrylic paints are known for their quick drying time and vibrant colors. Invest in a good range of colors, including primary colors and various shades of green for leaves and stems.
- Canvas: Choose a canvas of your preferred size and texture. A stretched canvas provides a solid surface to work on, while a canvas board offers portability.
- Brushes: Acrylic paints work well with synthetic brushes. Invest in a variety of brush shapes and sizes, including round, flat, and filbert brushes, to achieve different textures and details.
- Palette and Water: A palette for mixing colors and a container of water for cleaning brushes are essential.
- Easel: While not mandatory, an easel provides a comfortable and adjustable working position.
- Reference Images: Collect high-quality images of the flowers you want to paint. These references will guide you in terms of color, form, and composition.
Techniques for Acrylic Floral Painting
- Layering Colors: Acrylic paints are known for their opacity, which makes layering colors effective. Start with a basic sketch of your flower arrangement, then apply thin layers of paint, gradually building up colors to achieve depth and dimension.
- Blending: Wet-on-wet blending is a technique where you apply fresh paint to an area where the paint is still wet. This creates smooth transitions between colors, mimicking the softness of petals and leaves.
- Dry Brushing: Dry brushing involves using a brush with minimal paint to create texture and highlights. This technique is perfect for adding details like the intricate veins on petals or the fine hairs on leaves.
- Impasto: Impasto is the application of thick, textured paint. Use a palette knife to create raised areas, adding a tactile quality to your painting. This technique is excellent for emphasizing the texture of flower petals.
- Negative Painting: Negative painting involves painting the spaces around an object rather than the object itself. This technique is particularly effective for intricate backgrounds, allowing your subject to stand out.
- Glazing: Glazing involves layering translucent colors on top of each other to create a luminous effect. This technique is useful for achieving a sense of light filtering through petals.
- Detail Work: Use smaller brushes to add fine details, such as stamen, pistils, and dewdrops. These tiny elements contribute to the realism and visual interest of your painting.
Tips for Success
- Practice Blending: Master the art of blending to achieve smooth color transitions and gradients in your flower petals.
- Study Anatomy: Understanding the anatomy of flowers will help you accurately depict their structure and characteristics.
- Experiment with Brushes: Different brushes create different textures. Experiment with various brush shapes and sizes to find the ones that suit your style.
- Composition Matters: Pay attention to the arrangement of flowers, leaves, and any other elements. A well-composed painting draws the viewer’s eye and tells a compelling story.
- Play with Contrast: Experiment with contrasts in color, value, and texture to create visually dynamic and engaging paintings.
Conclusion
Acrylic floral painting is a delightful and rewarding endeavor that allows artists to capture the ephemeral beauty of flowers on canvas. With a variety of techniques at your disposal, you have the tools to create vibrant, textured, and expressive artworks that evoke the charm of nature. By exploring different methods, perfecting your brushwork, and infusing your personal style, you’ll be well on your way to creating stunning acrylic floral paintings that enchant and inspire.
